
It’s no secret that breastfeeding is one of the best things you can do for your baby. It provides them with important nutrients and antibodies that can help protect them from diseases. But breastfeeding can be difficult, especially in the beginning. One of the most common struggles is getting baby to latch properly at the breast. In this blog post, we will discuss some tips for successfully attaching your baby at the breast so both of you are comfortable and can enjoy breastfeeding! Let’s get started.
{We are a participant in the Amazon Services LLC Associates Program, an affiliate advertising program designed to provide a means for us to earn fees by linking to Amazon.com and affiliated sites. To learn more about affiliate links, click here!}

Attaching Your Baby At The Breast Correctly
When it comes to breastfeeding, there’s a lot that goes into it. From figuring out the best position for baby to latch on, to making sure baby is getting enough milk, it can be a lot to take in. But one of the most important things to focus on is attaching your baby at the breast. If baby is not attached correctly, it can lead to all sorts of problems, from poor milk transfer to discomfort for both baby and mom. So how do you make sure baby is attached correctly? Let’s get down to the nitty gritty….
Positioning and Attachment
First let’s start with position. Baby’s tummy should be facing your tummy. Baby’s head should be turned to face your breast and their body should be aligned. You don’t want baby to have to turn his head to attach to the breast. In every breastfeeding position, baby’s body and head should be facing you, not facing the ceiling or the opposite direction.
Baby’s Nose
Secondly, baby’s nose should be aligned with your nipple. You’ll want to grasp your breast tissue around the areola with your hand to form a “C” shape, and tickle baby’s nose and mouth until they open their mouth wide.
Latch On
Once baby’s mouth is wide open, latch baby on in a sweeping motion starting with baby’s lower lip and chin and then his upper lip. By scooping the breast tissue from baby’s chin to upper lip, you can help baby learn to put his tongue down so that he can properly suck to transfer milk.
The latch should be deep, so baby’s lips should be rolled out and their tongue should be down. If you feel like baby isn’t latched on properly, you can try gently breaking the suction and starting again. Remember – practice makes perfect! With a little patience and a lot of practice, you’ll be an attachment pro in no time.
Other Tips
You also want as much of the areola in baby’s mouth as can fit. You do not want baby to just suck on your nipple. Your milk ducts are located in the surrounding breast tissue and a deep latch will help baby empty your breasts, plus it will help prevent nipple trauma and discomfort as your nipple will be pressed against baby’s soft palette instead of his hard palette in his mouth.
What to Watch For
If baby is latched correctly, you should see your breast tissue move as baby sucks. You’ll also notice that his mouth is wide open and lips aren’t curled under, and that baby’s nose has space to breathe. Baby shouldn’t be making any smacking noises. And the discomfort of attaching your baby to your breast should go away after a couple of minutes. If you notice that any of these things are off, detach baby and try again. You may have to practice quite a bit at the beginning until you and baby get the hang of it.
How To Detach Baby
If baby’s latch isn’t quite right, you can insert on of your fingers between your breast tissue and into baby’s mouth to break the suction. You don’t want to just pull baby off while he’s still sucking as that could cause nipple trauma and discomfort.
Here is a great example of how to attach baby to your breast…
Early Feedings With A Newborn
Anyone who has ever tried to breastfeed knows that it is not always as easy as it looks. In fact, figuring out the best breastfeeding position can be a bit of a trial and error process. I always encourage my patients to practice different holds while baby is brand new so they can get the hang of how to hold their baby and get more comfortable with each position.
Some other things to try when baby is still in that sleepy newborn phase (Day 1 following birth) is skin-to-skin contact. Doing skin to skin helps regulate baby’s body temperature and blood sugar, and additionally signals to your brain that baby’s here and it’s time to make milk. Skin to skin can be practiced at any time in your baby’s life, and it basically just means that your baby is placed on your bare chest wearing only a diaper.
Also, it is important to keep your baby close to your body and to ensure that they are staying warm enough and can find the breast to eat. Once you see baby begin to root (open his mouth and lean toward your breast), you know it’s a good time to practice attaching him to your breast. This will help to keep him calm and prevent him from getting fussy which can make latching him on even more challenging.
Trying different positions until you find one that works best for you and your baby is the best way to ensure a successful breastfeeding experience. Be patient with yourself and with your baby. This is a new skill that you both are learning.

Best Breastfeeding Positions
There’s no one right way to breastfeed. different positions can be helpful in different situations. Some positions may be more comfortable for you, while others may help your baby latch on more effectively. And some positions may be better for different stages of breastfeeding.
Here are some different positions you can try:
– The Cradle Hold:
This is a classic position for breastfeeding. You can hold your baby in one arm and support their head with your hand. This position is great for younger babies or if you’re nursing for the first time.
– The Cross-Cradle Hold:
This position is similar to the cradle hold, but you’ll use your opposite arm to support your baby’s head. This can be helpful if your baby has difficulty latching on.
– The Football Hold:
This position can be helpful if you have large breasts or if you’re nursing an older baby. You’ll hold your baby under their arms, with their back against your chest. You can support their head with your hand or a pillow.
– The Side-Lying Position:
This position can be helpful if you’re nursing at night or if you’re dealing with engorgement issues. You’ll lie on your side, propped up with pillows, and your baby will lie next to you, facing you. You can use a pillow to support your arm and head.
– The Semi-Reclined Position:
This position can be helpful if you’re having trouble nursing in the traditional upright positions. You’ll sit back in a chair or recliner, with pillows propping you up. Your baby will lie on their back across your body, facing you.
Remember, there is no wrong way to breastfeed. Different positions work for different moms and babies. The important thing is to find a position that is comfortable for both of you and that allows your baby to latch on effectively. Experiment with different positions until you find one that works for you.
How To Tell If Baby Is Latched Correctly
Sore Nipples/Nipple Trauma
Sore nipples and nipple pain are often the first signs that baby is not latched on correctly. Look for baby’s upper lip to be flanged out (like a tube) and baby’s mouth wide open. The nipple should be attached to the back of baby’s mouth, with as much of the areola (the dark skin around the nipple) in baby’s mouth as possible.
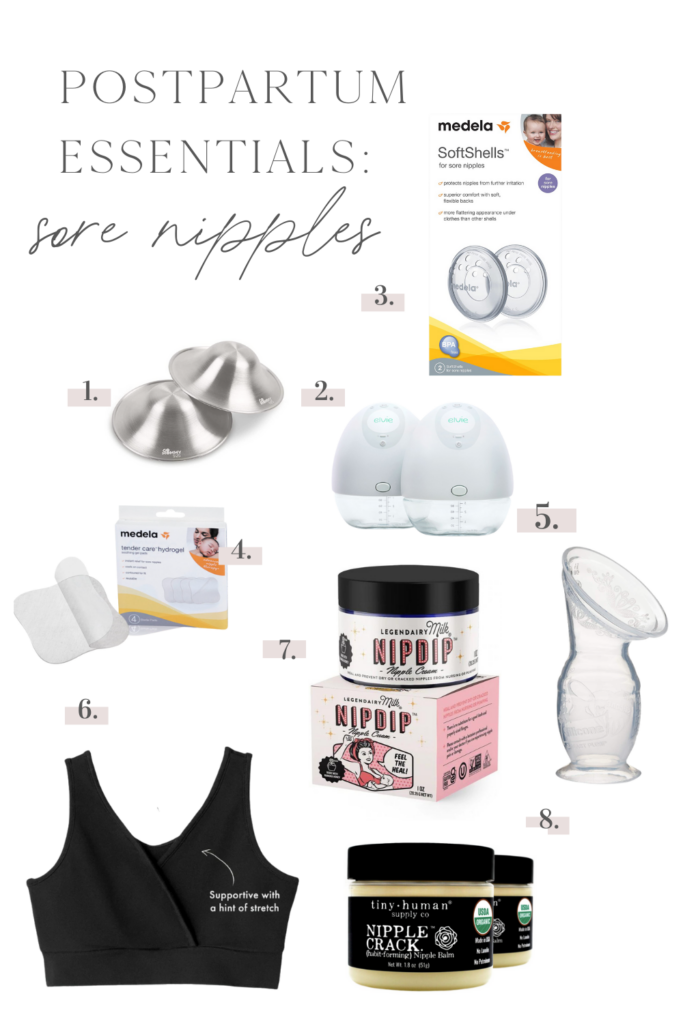
If you are sore or in pain after nursing, your baby is likely not latched on correctly. If you have sore nipples, you can try using lanolin, expressing breast milk, or silver cups to soothe them after nursing.
It may take a couple of weeks for your nipples to adjust to breastfeeding, but you shouldn’t be in horrible pain. If baby is latched on correctly, eventually you should not feel any pain. If you are unsure if baby is latched on correctly, ask a lactation consultant or your provider for help. They can usually tell right away if baby is latched on correctly and will be able to give you specific tips for improving latch.
Good Position
Baby should be attached to the breast so that a large amount of areola is visible above baby’s top lip. If you see more areola above the top lip, baby is not latched on correctly and needs to be re-latched. Sore nipples and nipple pain can also be caused by incorrect positioning. Be sure that baby’s tummy is against your tummy and that baby’s chin is tucked into your breast. Support your breast with your hand in a C shape so that your thumb is behind the areola and your fingers are behind the breast.
No Noises…Only Gulping
Another way to tell is by listening to see if baby is making a “gulping” sound while eating. If so, then they’re probably getting plenty of milk and actively swallowing. If you hear smacking or sucking noises this could mean baby isn’t attached well and could cause nipple trauma. Go ahead and detach baby from the breast and try again. Usually the issue is that baby is sucking on his own tongue or lips, so make sure that baby opens his mouth wide and that his lips are flanged around your breast tissue and that his tongue is down.
Gaining Weight
Once your milk comes in, another great way to know if baby is latched correctly is if he’s gaining weight. This is a good sign that he’s transferring milk and doing what he needs to do to empty your breasts. Keep in mind, it may take newborns up to 2 weeks and sometimes longer to gain their weight back and get back to their birth weight. Your baby’s pediatrician will closely monitor your baby to make sure he’s getting what he needs to stay healthy and grow.

How To Fix Baby’s Latch
Any parent of a newborn knows that the early days can be tough. baby’s need to be fed every few hours, and they often have trouble latching on. As a result, many new moms end up with sore nipples and frustrated babies. If you’re having trouble getting baby to latch, here are a few tips that may help.
-Baby’s Body
First, make sure baby’s body is in the right position. baby should be tummy-to-tummy with you, with baby’s head in the crook of your hand and baby’s neck supported. Once baby is positioned correctly, help baby open his or her mouth by tickling the lip with your nipple. When baby opens wide, aim for the back of the mouth and let baby latch on. It may take a few tries, but with a little patience you’ll get the hang of it.
-Baby’s Neck
Once baby is positioned correctly, it’s time to focus on her neck. You want baby’s head to be in line with her spine, so that she can open her mouth wide and latch on correctly. Use your hand to help support baby’s head and neck. This will give you better control verses lying baby’s head in the crook of your arm. If baby starts to get fussy, take a break and try again later.
-Baby Opens Mouth Wide
Wait for baby to open her mouth wide before attempting to latch her on to your nipple. If she doesn’t do this automatically, you can try gently tickling her lips with your nipple until she opens up. Remember to bring the baby to you. Don’t hunch over trying to fit your breast in baby’s mouth, bring the baby to you and help guide her with how to latch on. This is much more comfortable for both of you.
Once baby is latched on properly, she should start suckling rhythmically. You should feel comfortable, and there should be no pain. If you experience any pain, gently break the suction and try again. With a little practice, you’ll be a pro in no time.
If you continue to have difficulties, you may want to consider speaking with a lactation consultant. This is especially important while in the hospital, and even when you go home. Having a lactation consultant come to your home to assist you is a great idea! There’s no need to go at this alone. Breastfeeding can be one of the most rewarding things you’ll ever do, but also might be one of the most challenging as well.

Breastfeeding Challenges:
-Tongue https://www.webmd.com/children/tongue-tie-babiesTie
A tongue tie occurs when the tongue is tethered to the floor of the mouth by a thin piece of skin, known as the lingual frenulum. This can make it difficult to move the tongue freely, and may also cause problems with breastfeeding. While a tongue tie is not necessarily a serious medical condition, it can cause significant difficulties with eating and speaking. If you suspect that your baby may have a tongue tie, it is important to consult with a medical professional to determine the best course of treatment. In some cases, a simple procedure to release the tongue from the frenulum may be all that is needed.
–Inverted Nipples
Inverted nipples are when the nipple is pulled inwards instead of pointing outwards. This can make it difficult for a baby to latch on, but it doesn’t mean that they won’t be able to drink milk. There are plenty of other ways to get milk into a baby’s mouth, so don’t worry if your nipples are inverted. Your baby will still be able to get all the nutrients they need. Work with your postpartum nurse and lactation consultant to figure out a plan for you and your baby. This could include anything from pumping to using a nipple shield.
–Premature Baby
Premature babies often have a harder time breastfeeding than full-term infants. Part of the problem is simply a matter of size- premature babies are often too small to latch onto the nipple correctly, and they may tire easily during feeds. Additionally, many premature babies have weakened suck reflexes, which can make it difficult to get enough milk from the breast.
In some cases, medical interventions such as tube feeding or IV fluids can also interfere with breastfeeding. Typically we encourage mothers to start pumping right away to get their milk supply started, and encourage lots of skin to skin if baby’s health allows. Milk may be delayed in coming in, so it’s important to get a jump start on pumping and feeding right away to ensure success down the road.
-Jaundice
Jaundice is a yellow discoloration of the skin and whites of the eyes. It occurs when there is an accumulation of bilirubin in the blood. Bilirubin is a yellow pigment that is produced when red blood cells are broken down. Jaundice can cause a baby to have a hard time breastfeeding because it can make them very sleepy and unable to stay awake for long periods of time. Additionally, jaundice treatment can include long hours of baby lying under UV lights to break down the bilirubin which can interfere with mom and baby bonding.
Jaundice is a serious issue, though, and must be treated accordingly. Bili lights and sometimes even supplementation with formula are all aimed at treating baby’s condition and don’t necessarily mean you won’t be able to breastfeed. Usually baby’s recover quickly and can go right back to breastfeeding with a little assistance. Your care team will help you in creating a plan to care for your baby.
-Low Blood Sugar
Lastly, sometimes a baby is born that needs supplementation for low blood sugars. We see this oftentimes in LGA (large for gestational age) babies who are typically born to GDM (gestational diabetes) moms. Or even in SGA (small for gestational age) babies. These babies oftentimes deal with low blood sugars and need early supplementation.
Your nurse and lactation consultant will work with you though to be able to maintain breastfeeding and bonding through SNS tube feedings and finger feedings where we feeding formula through a small tube while baby is sucking at the breast or doing some finger suck training.
Where there’s a will there’s a way. And, if you have patience and keep working at it, you can overcome these challenges and go on to have a beautiful breastfeeding experience.

How To Treat Sore or Cracked Nipples
Nursing a newborn is a wonderful experience, but it can also be painful—literally. In the early weeks, it’s not uncommon for mothers to experience sore or cracked nipples. This is usually due to poor attachment or position during feeding. Try different positions and make sure your baby is latched on correctly. If you’re still having trouble, consult a lactation specialist. They can help you troubleshoot any other issues that may be causing pain. Before you know it, you’ll be enjoying those special nursing moments pain-free!
Here are a few of our favorite resources for treating sore, cracked nipples…
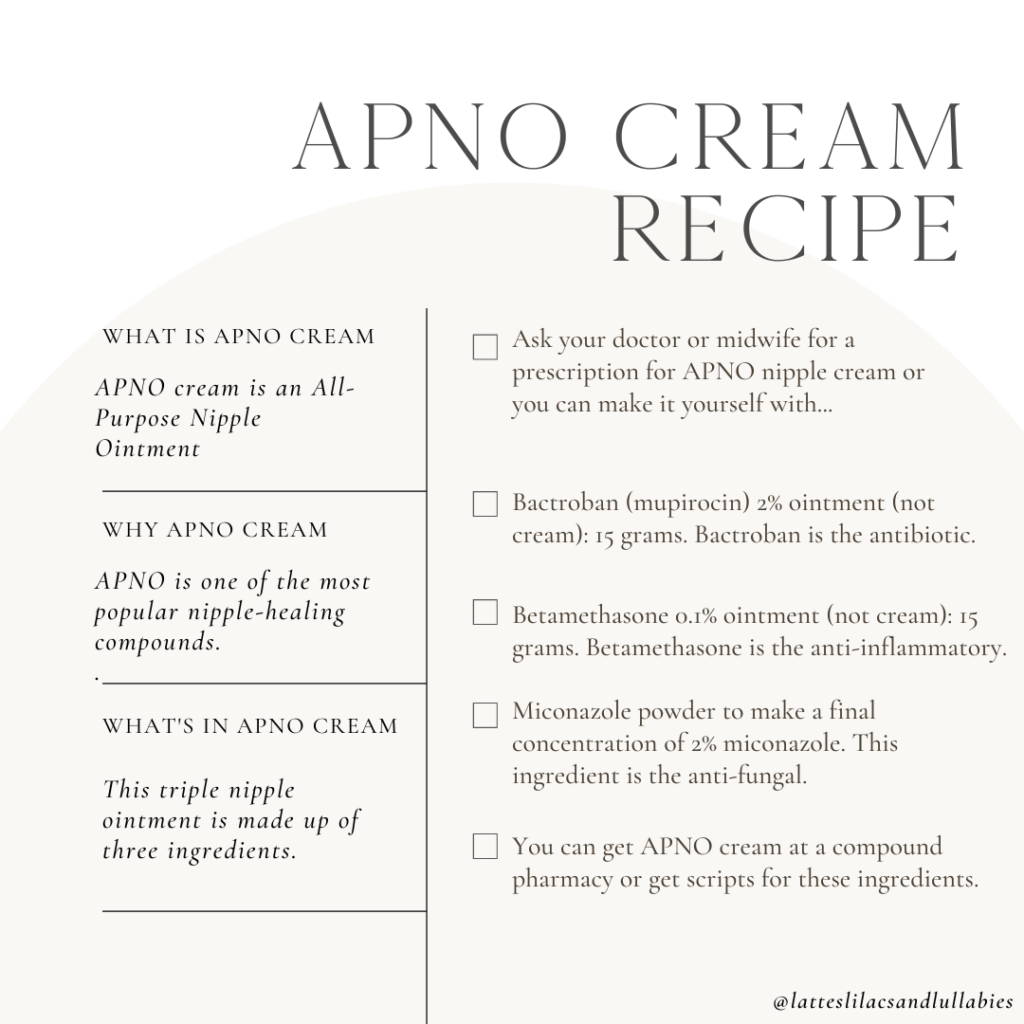
All-Purpose Nipple Ointment is the creation of Dr. Jack Newman, a leading breastfeeding researcher and founder of the International Breastfeeding Centre in Canada. APNO is one of the most popular nipple-healing and infection-fighting compounds that breastfeeding mothers use. This triple nipple ointment is made up of three ingredients. They are:
VeryWell Family
- An antibiotic: Antibiotics help to heal nipple pain by stopping the growth of bacteria. Preventing the growth of bacteria on the nipples can also help protect against mastitis.
- An anti-inflammatory: This type of medication eases nipple pain by reducing any swelling caused by injury, infection, or skin irritation.
- An anti-fungal: The anti-fungal ingredient in APNO helps to fight off Candida. Candida is the yeast that causes the fungal infection called thrush.
These three ingredients work together to help soothe the pain and fight off the common organisms that cause sore nipples. Ask your doctor or midwife for a prescription or you can make your own using the recipe below.
–Silverette Cups– Silverette are small cups crafted out of pure 925 silver that fit over and help to protect nipples while breastfeeding. Since 2002, Silverette cups have enjoyed a resounding and growing success with mothers, doctors and obstetricians. They are the only and original nursing cups made in Italy by fully licensed silversmiths. Silverette cups are easy and comfortable to use – and no additional creams or lotions are necessary.
–Pump
How to Make APNO Cream: The Recipe
“All Purpose Nipple Ointment is a custom medication that requires a prescription. If, after you speak to your doctor and have an exam, the doctor believes this medication can help, she can provide you with a detailed prescription. Certain pharmacies, known as compounding pharmacies, can prepare this ointment for you. You can also make the mixture yourself, but you still need a prescription. Here’s what you need to make APNO.
- Bactroban (mupirocin) 2% ointment (not cream): 15 grams. Bactroban is the antibiotic. It treats infections of the skin. For this ingredient, you will need to get a prescription from your doctor. If you are not able to get Bactroban, you can use bacitracin. However, bacitracin does not work as well.
- Betamethasone 0.1% ointment (not cream): 15 grams. Betamethasone is the anti-inflammatory. It treats swelling, itching, dryness, redness, and general irritation of the skin from conditions such as infections, allergic reactions, and eczema. Your doctor can give you a prescription for this medication, or you can get it over-the-counter in a weaker concentration.
- Miconazole powder to make a final concentration of 2% miconazole. This ingredient is the anti-fungal. It treats yeast and fungal infections of the skin. This medication is available by prescription and over-the-counter. According to Dr. Newman, if miconazole powder is not available, it is better not to substitute anything and just include the two ointments. It is also better to choose an anti-fungal powder over an ointment because it will give you a better concentration of the antifungal agent, and the concentrations of the mupirocin and betamethasone will stay higher.
- Optional: It may also be helpful to add ibuprofen powder so that the final concentration of ibuprofen is 2%. Ibuprofen is a pain reliever.
Combine all the ingredients in equal parts. Once the mixture is complete, you should have approximately 30 grams or one ounce of APNO.” -VeryWell Family
In Conclusion
There are many challenges that can arise when breastfeeding, but with the help of your care team, you can overcome them! Be patient and keep working at it and you will be able to enjoy those special nursing moments with your baby. If you’re having trouble, consult a lactation specialist for help. And make sure to take care of your own nipples with some of our favorite products! With a little TLC, you’ll be pain-free in no time. Thanks for reading!
More Posts You’ll Love…
- Postpartum Care Kit: All Essentials You’ll Need
- The 4th Trimester: What New Parents Need To Know
- Best Way to Swaddle a Newborn At Night
- Hospital Bag Checklist
- What The Hospital Provides After Birth
- Hospital Bag for Dad: What To Pack
- The Best Push Presents for Mom
- Ultimate Guide to Baby Essentials: What New Parents Need in the First 3 Months
- Best Snacks To Pack In A Hospital Bag
Stephanie Wilson

