I can hardly believe that it was just a couple of years ago when I decided to take the plunge and start a blog of my own to share our bucket list busting journey through newly wed life and to share our struggles with starting a family.
Now, here I am many months, countless sleepless nights, lattes galore, and many thousands of new friends later and I’ve completely fallen in love with the blogging world.
{We are a participant in the Amazon Services LLC Associates Program, an affiliate advertising program designed to provide a means for us to earn fees by linking to Amazon.com and affiliated sites. To learn more about affiliate links, click here!}
Before I ever started my blog, I spent over a year preparing and learning. You may be in that same boat today. Maybe you stumbled across my website with a dream and story to tell, and I hope to help you on your way like many bloggers before me did for my journey into the world wide web.
But, even after I started my blog, I quickly discovered there was much more to learn. Things like how to connect with my audience, how to be present on social media without giving all of my time to my business, & how to market and advertise myself.
I also learned that there were ways to grow my blog through SEO {search engine optimization}, proper blog post writing, branding, and so on and so forth. There was so much to grasp it felt overwhelming at times, but I knew I had a dream and a mission.
Perhaps you came here today for some inspiration because you have a blog and you want more than anything for it to be successful and you want to share you gifts and experiences with the world.
Well, I hear ya, sister. I was once in your shoes too.
It’s taken me many months and countless hours of work and learning to grow my blog into a business and I hope to help you do the same today.
But, let’s start simple {my favorite word} and start at the very beginning with how to set up a blog, and start a blog so that you too can be a success.
There is a way for you to establish yourself in the blog-ishere, make some extra cash, and connect with new friends all across the globe. It’s a magical thing, and I can’t wait to help you get started. So, let’s go…

First things first, whether you’re just starting out or have been blogging for a while now, let’s get back to the basics and that is….
Who Is Your Target Audience?
Your targeted readers could be athletes, home cooks, professionals, stay-at-home moms, teachers, etc. You name it.
For example, typically my audience are younger women who are either just starting their families or are already knee-deep in diapers and legos. My audience like to read about fun date nights, travel ideas, DIY decor, and cozy lifestyles.
I’ve heard it said that,
“There are riches in the niches.”
Meaning that if you hone in on a particular audience, you’ll have greater success at growing your blog into a thriving business. But, can I caution you to be careful when picking a “niche”.
When you start your blog pick topics that you can write about and an audience that you can connect with for a long time from now. It takes hard work to build up your website content, and it only makes it harder if you flip flop from one niche to another.
That’s why I’ve just recently changed my website around a little bit to be simpler and more appealing to a broader audience. I’m not just talking about fertility and new babies anymore. I’ve added in more lifestyle posts, travel, home decor, recipes, and more that the same audience interested in my original contant will enjoy also.

What Is Your Style?
Another thing to think about before you begin, is what your blog style will be. Do you like bold colors, or a simpler color palette? Will you write in a funny, sarcastic tone or a more serious, authoritative tone? Will your website be faith-based?
Think about the overall feel and experience you want your reader to experience while on your website. What companies would you like to partner with in the future? What products would you like to offer?
Make sure that your “brand” and your audience match up, and search for inspiration on Pinterest. Pinterest offered me plenty of ideas when I was just starting my blogging journey. I found several websites and writing styles that I connected with, and have incorporated those details into my own website.

Now that you’ve determined your target audience, style, and possible niche or two, let’s talk about how to get your blog up and running! This is a big and exciting step! Woohoo!
1. Selecting Your Blog Name
I’m sure if you’ve been thinking about starting a blog then you’ve probably tossed a few name ideas around in your head. Picking a website name is a big decision. It sets the tone for your entire website and branding, and can really draw people in.
Here’s a few tips in picking the name of your blog…
- Pick Something Simple & Easy To Remember- no crazy spellings, hyphens, etc
- Check To See If It’s Available On A Webhosting Page Like Bluehost– type in your possible blog title and try to only choose a name that’s available in .com
- Make Sure All Necessary Social Media Channels Also Have That Name Available- you’ll want your social channels to match your website name
Once you’ve narrowed it down to a few names, pick one. Trust your gut and go with your instincts. Don’t get hung up on picking a name and put off starting your blog.
2. Setting Up Your Domain & Hosting
After you’ve chosen your blog name & verified that it is available, next you’ll need to purchase your domain & set up web hosting. First, things first, let’s define what these are to clear up any confusiong.
~ A Domain is the URL for your website. For instance, my URL is www.latteslilacsandlullabies.com. To “buy” your website, you’ll need to pay an annual fee.
~ Web Hosting is basically renting space on the internet where your website/URL will live. You need both to set up a successful, profitable blog.
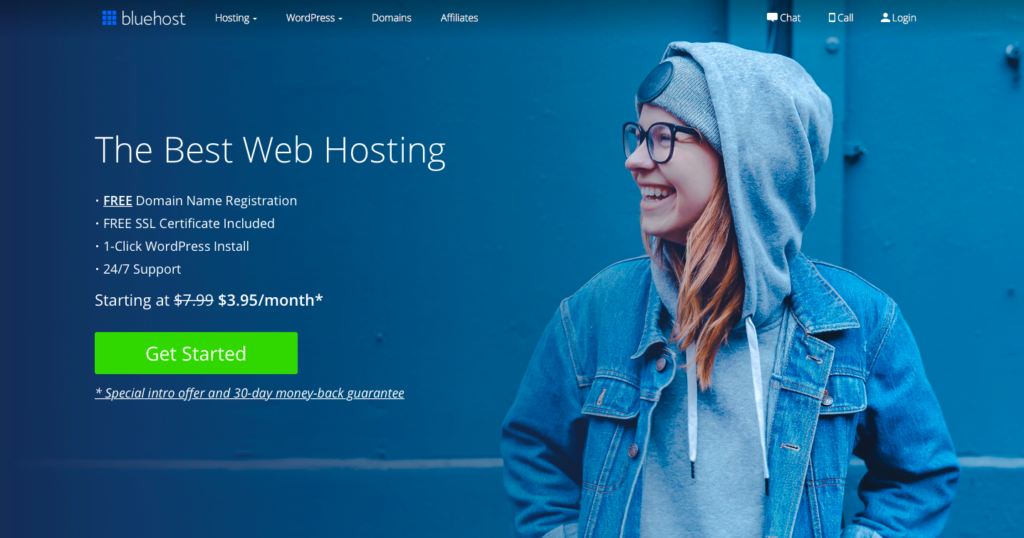
My web hosting is through BlueHost. They include the domain/URL with the purchase of a hosting package, so you can start a blog for as little as 3.95/mo. They also include customer service and web support, which has saved me countless times from internet disasters.
Let me walk you through the process of starting your website on BlueHost. Are you ready?
First, go to BlueHost.com and click on the green “Get Started” button.
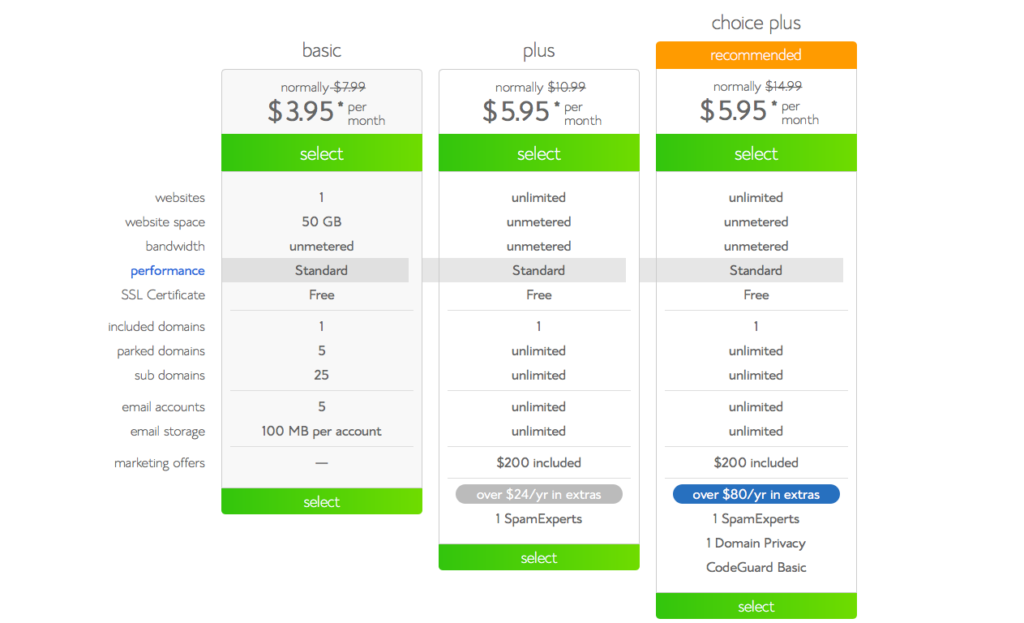
Next, select your plan. If you are just starting your blog, I’d recommend the Basic Plan. That’s what I used to set up my first blog & it worked fabulously. Once you start gaining more consistent traffic, you may want to upgrade, but until then the Basic Plan is the way to go.
Once you select your plan, and then you’ll be sent to this page where you can enter the blog name you’ve chosen.
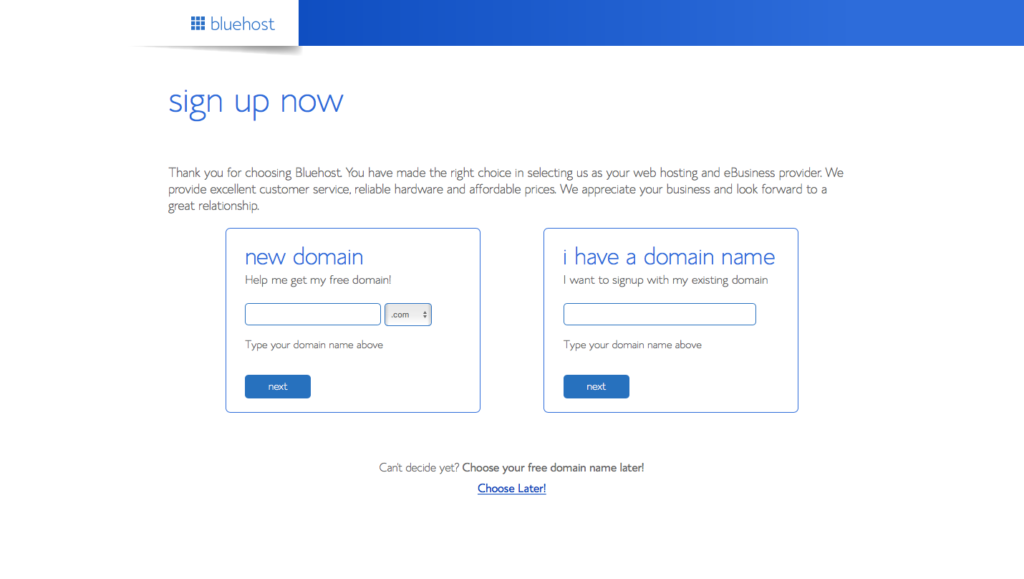
If you haven’t purchased your domain name yet, enter the domain you’d like in the box on the LEFT. If you’ve already purchased your blog’s domain, enter it on the RIGHT. Remember, with a plan through BlueHost, your domain is INCLUDED!! WOOHOO! That’s a win-win!
Make sure you check your spelling and that your domain is .com. You don’t want to accidently register the wrong domain name.
Next, you’ll be sent to this page to enter your information select any extra bells and whistles you may need for your website hosting, and make your purchase.
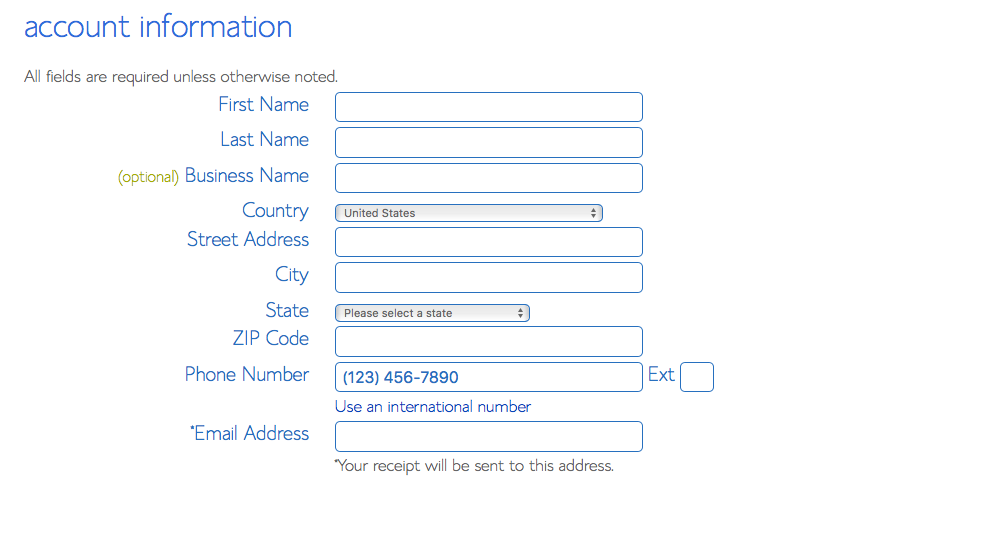
I don’t think you need any of these extras, and just unclicked the boxes.
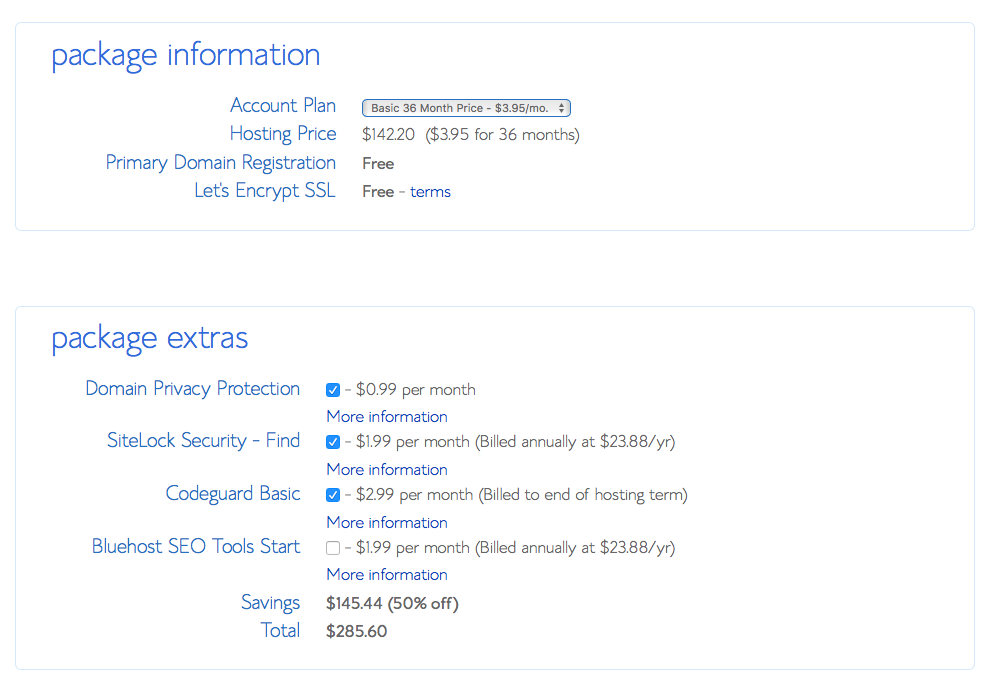
I recommend selecting the 36 month long hosting period for 3.95/mo for the Basic Plan. Buying the web hosting for 36 months or longer will save you money in the long run.

Yay! You did it! You’ve set up your domain and your web hosting! That was pretty easy, right? Now let’s get that beautiful website up and running, shall we?
3. Setting Up Your Blog On WordPress
Now that you’ve set up your domain and web hosting, it’s time to get your blog up and running with WordPress. If you are wanting your blog to be successful and one day make you some mulah, then you need to start a self-hosted blog on WordPress.org.
Stay away from free hosted blog sites like GoDaddy, Wix, or even WordPress.com. These websites will end up costing you more money in the long run, and if your blog grows and grows where you have money making potential, you’ll have to switch to a self-hosted WordPress website anyways.
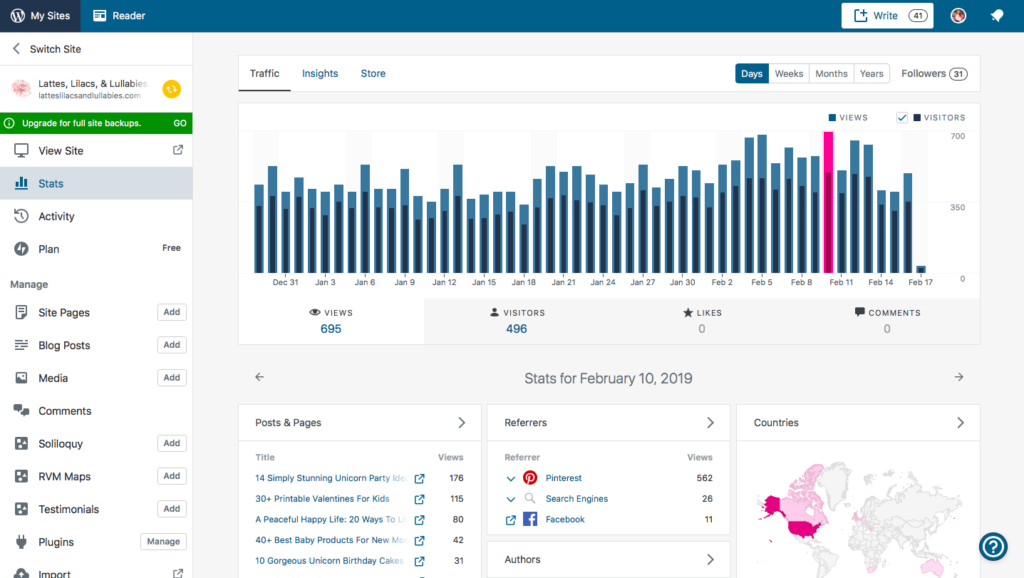
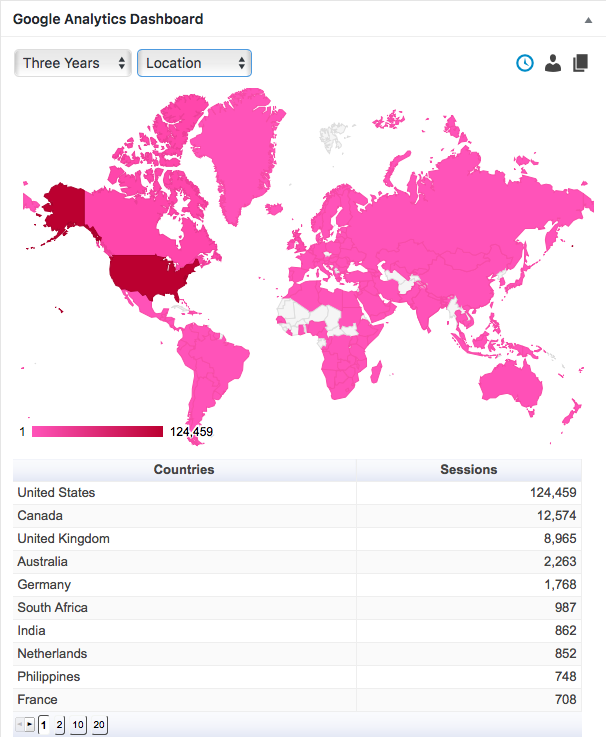
Save yourself the hassle and sign up with WordPress from the start. WordPress will become your behind-the-scenes blog hub and where you’ll spend most of your time building and creating your dream blog. Plus, they offer really cool analytics to show you how your blog is doing. Here’s an example from my blog….
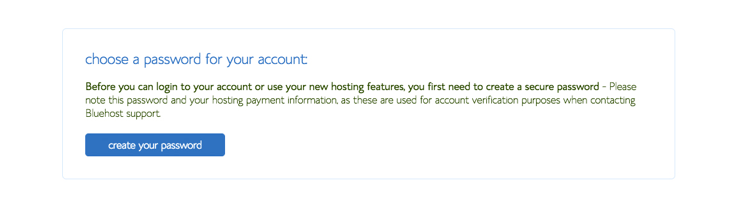
The good thing about signing up with web hosting through BlueHost is that they work closely with WordPress. So, once you’ve paid for your webhosting you’ll automatically be redirected to WordPress.org to choose a password to get things rolling…
You’ll then be asked to log into WordPress and pick a theme. Don’t worry about which theme you pick right now, because I’m going to walk you through how to upload your favorite theme later.
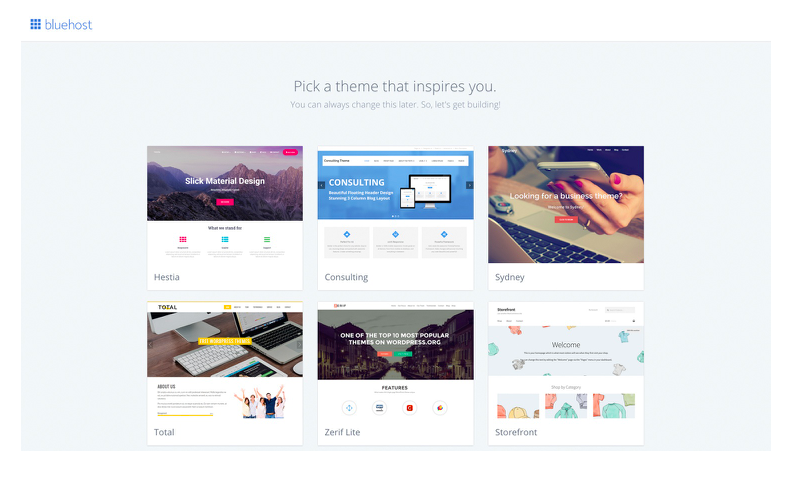
Once you’ve chosen a theme, it’s time to start building your site!
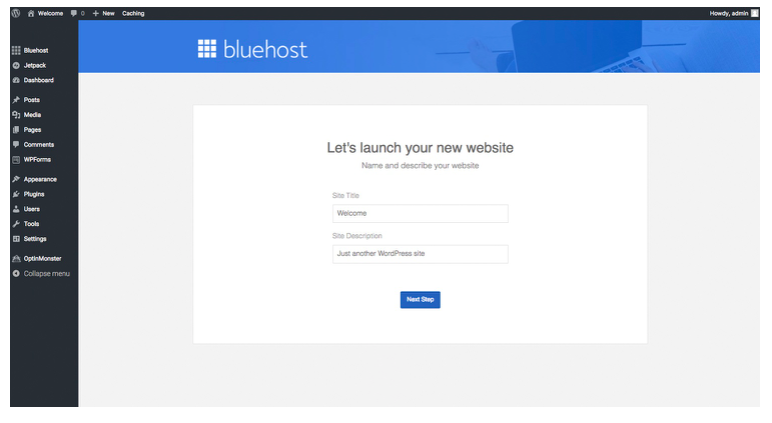
Next, you’ll be asked whether your blog is personal or business. Go ahead and click business if you plan to turn your blog into a money-making-machine! Yeah! High-five here!

Now, fill in your website’s name and description. Don’t get too hung up here. You’ll be able to come back and change your description once you’ve begun blogging and hone in on what your audience loves and what you love to write about.
The next few steps…
- Choose “A Static Welcome Page Here”. No matter what theme you choose, it’s always nice to have a Welcome Page as your “Home” where you can display your blog posts, about me section, photos, social media, products, & more. You can check out my Welcome Page/Home here.
- Click “Not Now” so that your website isn’t shared with the entire blog-isphere quite yet. You don’t want to “go live” until you have things a little more put together so you present the best to the world.
- & Click “Not Now” when it comes to installing WooCommerce. WooCommerce is a fancy plug-in that allows to set up an online store right on your blog. Wait and see if you find a theme that is WooCommerce compatible before installing. For an example, you can check out my Shop here.
Yay! You Did It! Your blog is up and running! Now, let’s get acquainted with your WordPress Dashboard and where you’ll create all that amazing content we all can’t wait to read!
From now on when you’re ready to log in to your dashboard, behind-the-scenes of your blog, you’ll enter www.yourdomain.com/admin. You’ll see this sceen pop up…
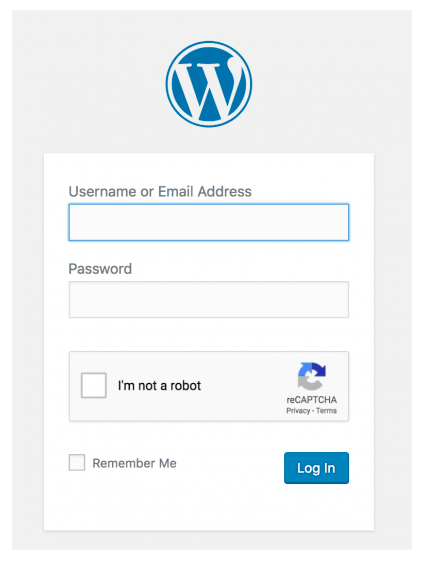
Type in your username and password that you set up just a couple of steps ago, and then it’s time to get started. You’ll see your dashboard and it should look something like this…
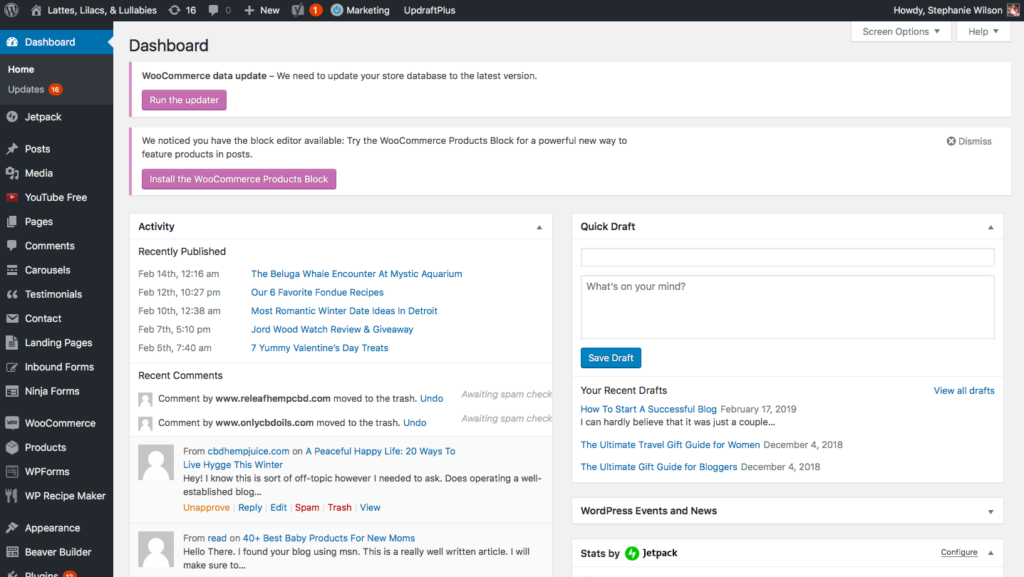
On the left-hand column of your dashboard you’ll see…
- Posts- where you’ll write and edit your blog posts
- Media- where you’ll upload graphics and awesome pics to add to your posts & website
- Pages- where you’ll create your static pages like your About Me or Contant
- Comments- where you can approve and respond to your readers
- Appearance- where you can customize the look and design of your website, like changing colors and fonts and uploading your logo
- Plugins- where you’ll add fun things to your website like carousels, instagram feeds, recipes, maps, etc.
- Settings- where you can edit your description and such
For more information about WordPress and setting it up, check out WordPress for Beginners!
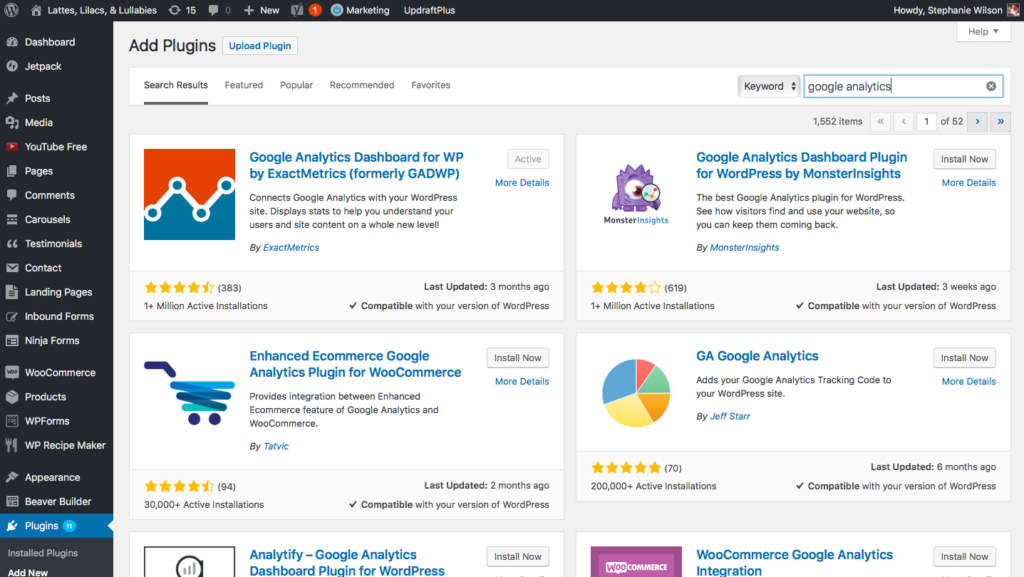
4. Connecting Your Website to Google Analytics
The first plug-in you’ll want to install is Google Analytics. Go to the Plugins tab on the left-hand side of your dashboard and click “Add New”. Then type “Google Analytics” into the search bar and follow the instructions for set up.
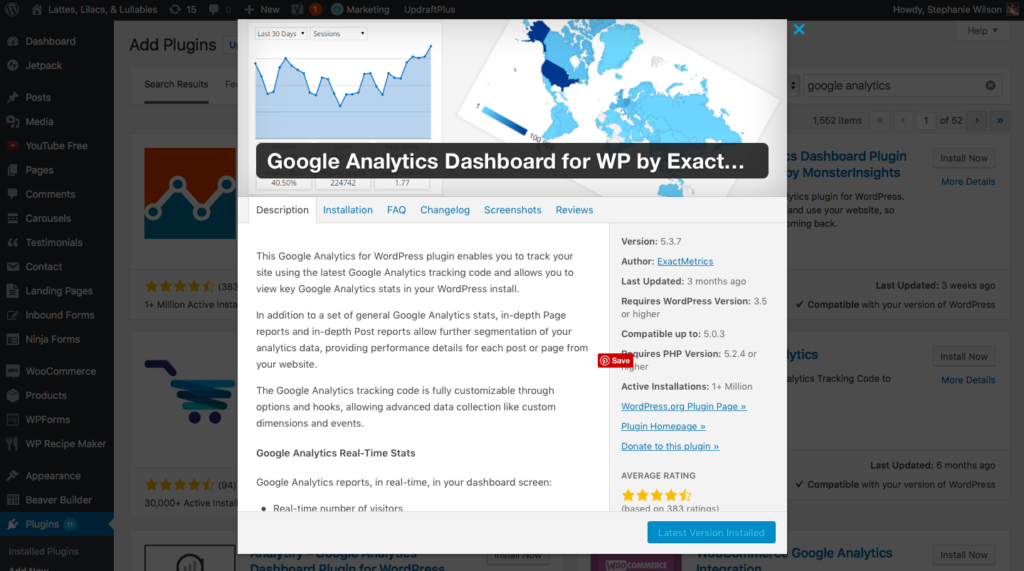
Google Analytics will give you incredible insight into your site’s visitors. It tells you how readers are finding your site, what devices they’re viewing it on, where they are from, and so on and so forth.

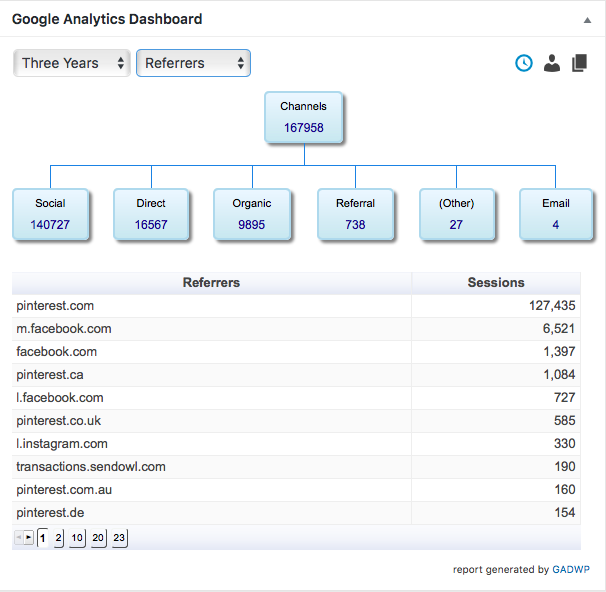
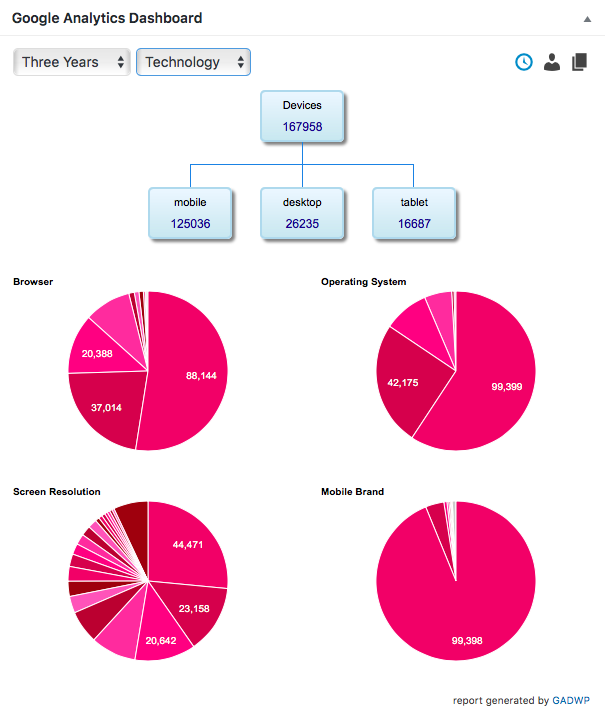
It’s a great tool to have set up from day one! I wish I had Google Analytics the day I started.

1. Picking the Perfect Theme
I love, love, LOVE website design, so I’m super excited to get into this portion of setting up your dream blog. Searching and shopping for blog themes is a lot of fun, and helps you figure out what features you’d like your website to have and what the overall look of your website should be.
Take some time searching for a theme. Once you’ve installed a theme, it can be challenging to change later on down the road. I’ve changed themes 3 times in 3 years, and it is time-consuming to say the least.
Sometimes when changing themes, you may end up needing some professional help because there is a lot of changes to the background coding too. So, choose your theme carefully.
Just a few thoughts of choosing a theme…
- Check if the theme you love runs off of Genesis Framework, which is another one-time purchase that aids your theme to run smoothly. My first theme required Genesis Framework, so it is installed on the backend of my blog. Click here to learn why Genesis is the foundation of any smart WordPress design.
- Make sure your theme is Mobile Responsive basically meaning that it will look great on an iphone, tablet, as well as a computor. These themes automatically reset everything so that your blog can be enjoyed on any device! Super valuable!
- And, check to see if your theme comes with some Customer Support and instructions for set-up. It can be tricky getting everything just right, so it’s imperative to choose a theme and a company that will suport you through the long term.
Some of my favorite themes are by Lauren at Restored 316. Her feminine WordPress themes are easy to install and she gives detailed step-by-step instructions as well as continued customer support.
You can see an installed Restored 316 website with the Refined theme at my mommy website….
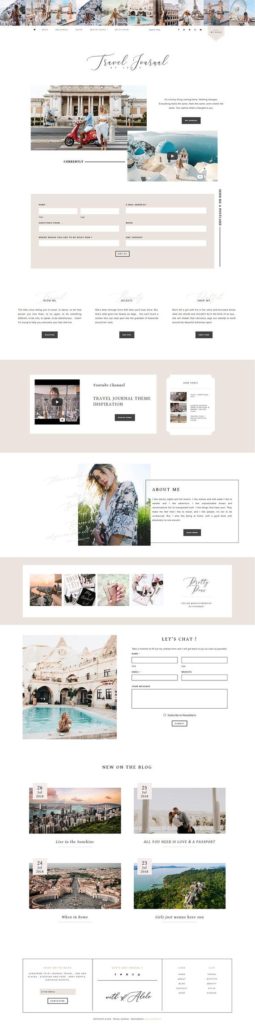
Click HereEtsy is another great place to find custom themes. I bought my very first theme on Etsy, and that’s exactly where I found my brand new travel-inspired theme that you see today. Adalaine Designs created my current theme and I absolutely love it!
Blog themes vary in price. My first theme cost around $15 dollars, then I moved to more expensive themes ranging between $65-100. I would recommend investing in a premium theme that is mobile responsive, offers WooCommerce capability, homepage settings with customizable widgets, and customer service.
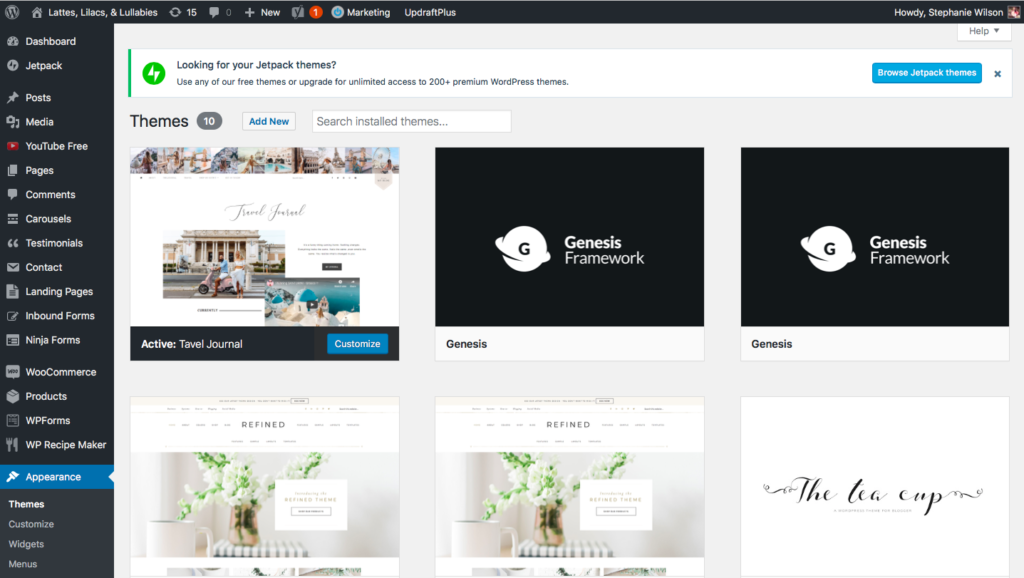
Now that you’ve bought your theme, let’s get it installed…
- Download the .zip file that the seller will send you {don’t unzip file}
- Log into WordPress Dashboard
- Go to Appearance > Themes > Upload
- Upload the .zip file you just downloaded, & follow the instructions for installation and customization

2. Personalizing Your Brand
Branding is a lot more than color schemes, fonts, and such. Think about what you want your readers to feel when they visit your blog. How do you want to come across? Do you want to be funny, positive, controversial, straight-to-the-point, no-fuss no-guss, etc.
The best place to start brainstorming your brand is Pinterest. Create a Pinterest board of your favorite color schemes, quotes, post ideas, general ideas, etc.
Then, search Pinterest for content you’d like to ultimately create for your blog. Check out the bloggers behind those pins. How are their websites set up. How is there writing style. Collect ideas and inspiration as you go, and your brand will build itself.
3. Selecting Your Logo & Design
I bought my first logo design on Etsy for around $15. Etsy is a really great place to find affordable blog logo’s for any theme.
If you have the money to spend on custom branding and website design, then kudos to you! I love Autumn Lane Paperie for customization needs.
If you are more of a DIY’er, search Creative Market for fonts and other design details you’d like to add to your site and create your own designs on a photo program like Canva or PicMonkey.
I created my current logo on Canva using my signature font that I bought off of Creative Market, and I include my signature watercolor florals throughout my website and on my eBook that were the color inspiration for my new simplified website.

Canva is an easy program to use, and allows you to download your brand colors and fonts so that customizing products, pins, and blog graphics are as easy as 1, 2, 3.
4. Customizing Your User Experience
How do you want readers to navigate around your blog? That is the user-experience we’re talking about. Be gracious with yourself. Remember, Rome wasn’t built in a day, and neither will your website.
Study your favorite blogs and take notes of how they have things set up. How do they help readers get to the must-read content, freebies, products, and more. Map out what you’d like to include on your home page so that when it comes time it’s easier to build.
Here’s a few things to increase your user experience and engagement…
- Menu- set a clear menu at the top of your website so that readers can find what they’re looking for
- Search- a search bar is always a good option so readers can quickly find specific things
- Clear Topics & Categories- as you create your content set a few categories to organize your posts for easy finding
- Social Media Icons- include social media icons on your site so that readers can follow you on social media and connect with you
- About Me/Mission- include a clear mission statement of what your readers will find on your website, & include a little information about yourself so your readers get to know you
- Related Blog Posts- install a plug in that displays related blog posts underneath each post so that your readers can find more inspiration quickly and easily
- Click-Throughs- add additional content that you’ve created as links in your posts and throughout your home page to help readers connect with the information they’re looking for
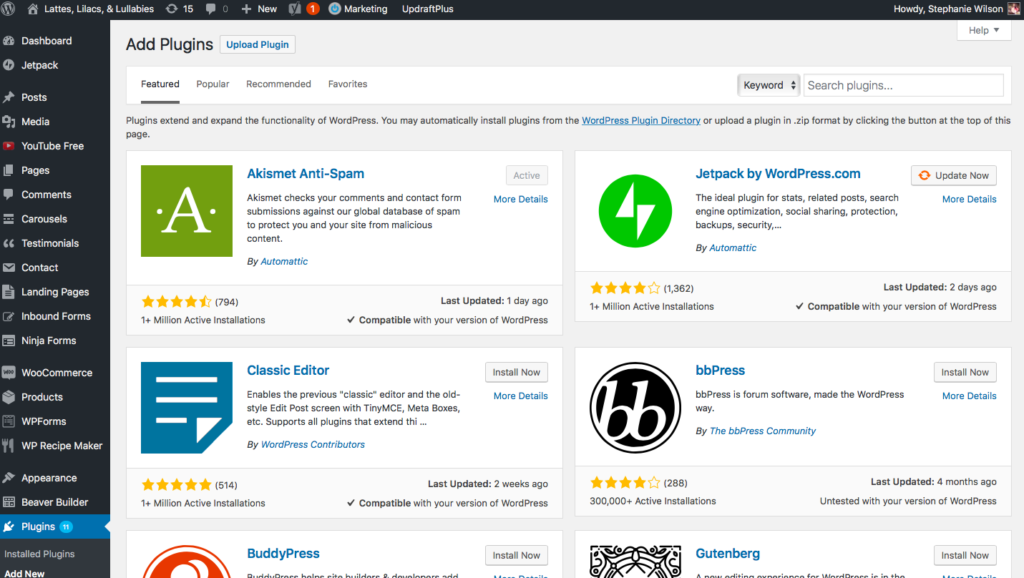
5. Adding Must-Have Plug Ins
Plugins help you customize your website and helps things run smoothly on the backend. They’re like your little secret elves doing some of the dirty work and organization behind-the-scenes.
Here are some of my favorite plugins…
- Akismet Anti-Spam catches and deletes spammy messages and comments that can bog down your blog. It’s a powerful little tool.
- Yoast SEO makes optimizing your blog posts on google searches easy! SEO, or Search Engine Optimization, is an important aspect of blogging new bloggers need to learn, and this plugin helps you find keywords and improves your posts so they see more readers see your content.
- Google Analytics so you can pinpoint who your readers are and where they’re coming from!
- Social Warfare is a great social sharing tool that helps you share your content across various social media platforms.
- Updraft Plus because you always ALWAYS want to back up your site!
- Instagram Feed to display your gorgeous instagram photos
- jQuery Pin It Button so that your readers can quickly and easily pin your content to their Pinterest boards
- Related Posts by Sovrn that displayes related content for your readers to keep their adventure going on your blog

1. Setting Up The Main Pages
Main pages are basically static content that inform or instruct your readers. They include important things like your About Me page, Contact form, and Disclosure Policy. These are extremely important to add to your website.
Here are some Main Page ideas…
- About Page is where your readers will learn more about you and what they’ll find on your website.
- Contact Page is a quick and easy way for your readers or potential businesses to contact you is they have questions or business propositions for you.
- Disclosure Policy is extremely important if you ever want to make money on your blog. Before sharing products or links where you earn a profit, you must disclose this to your readers….thus the need for a disclosure policy.
- Copyright Page just reminds visitors that your content and images are yours and are not to be stolen or used without your permission.
2. Writing A Blog Post
When I write a blog post I usually tackle it in 3 different sections. The intro, the main content, and the closing.
The main content usually takes the most time, so I tend to begin there. First, I make write out an outline of points I want to make and those become my headers. Then I fill in the rest of the content with paragraphs rich in keywords and phrases which we’ll talk about next.
Lastly, I add an intro that is catchy and pulls the audience in, and a conclusion that gives a call to action to the reader like an question to be answered in the comments or a sign up form for a freebie or my newsletter.
And, wallah! A blog post is born!

Here a few things I like to add to every blog post…
- Disclosure Policy- to inform the readers that I may make some money off of products they buy through the links
- Pin Image- so that readers can pin the blog post to Pinterest & so that I can drive traffic back to my blog on Pinterest when I pin the image
- Email Sign-Up Form- that I create on ConvertKit {which we’ll talk about soon} that includes some sort of freebie or my newsletter
- Links to other blog posts, websites, or products I’m affiliate with
- Featured Image that displayes when shared to social media
3. Learning The Basics of SEO
Before creating your first blog post, search for the topic in google and see what comes up. Use that research to create an awesome blog title, and include some of the keywords in your post.
For instance, one of my most popular posts I wrote after my nieces 10th birthday party where she wanted anything and everything unicorn. Unicorn birthday parties are so huge right now, so after a quick google search I decided to write a couple of blog posts. One featuring easy unicorn party decorations, and the other featuring unicorn birthday cakes.
Those posts have been shared thousands of times on Pinterest and drive an amazing amoung of traffic to my blog because I used key words like “unicorn”, “birthday”, “cake”, “decorations”, etc in my post which is what someone would type into google when search for party ideas.
Yoast SEO will either give you a green light, yellow light, or red light on your blog post when you type in what you think your keyword or phrase is in any given blog post you write. Shoot for green every time, and then rest assured you’ve got a search engine optimized post in your hands!
4. Setting Up A Content Schedule
Setting up a consistent content schedule has always been a challenge for me because I work full-time. It’s hard to create amazing content without a clear plan in place.
I try to publish 3-4 new blog posts every week that way my readers have plenty of new content to read. It’s more important to me that I put out really good posts that are going to rank high on google, than to post small snippets of random things just so that I post every single day. That offers no value in the long run.
Recently, I’ve set up a work schedule that goes like this…
- Blog Post Day– where I work specifically on creating new content, writing, finding images, creating pins for those posts, etc.
- Social Media Day– where I spend my time scheduling my pins for the week and Instagram posts for the week using Tailwind, create new pins for old content to share on Pinterest, answer emails, etc.
- Project Day– where I edit my website, and create new courses or ebooks.
The more you write and create blog posts the easier it will get. Set up a schedule that works for you, and as time goes on it will get easier and faster.
5. Writing Pillar Posts
Try to stick to 2-3 categories at the beginning so that you can create a few blog posts in those categories so your readers have plenty to explore in each topic. Then, after you’ve written a few articles for each category you can venture into another subject.
Make your blog the place to go for information on whatever topic you decide to write about.
6. Creating Beautiful Images & Graphics
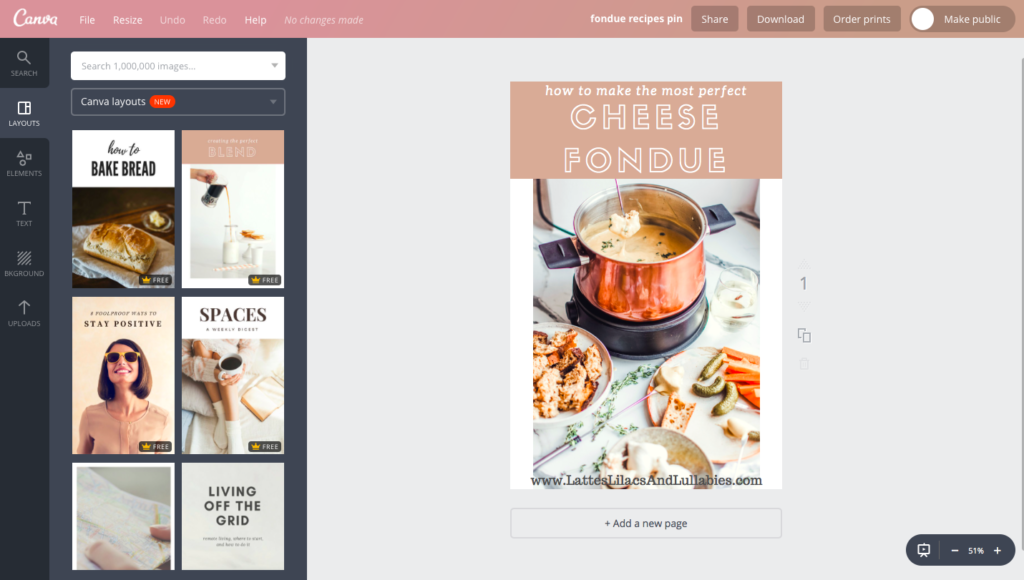
I use Canva to create beautiful pins and graphics to use on my website. They have several professionl templates that make my pins look amazing!
There are a few places I like to search for stock photos…
- Unsplash offers gorgeous FREE stock photos
- Haute Stock Co. has the most amazing feminine stock photo collection but require a membership
Be careful to always give credit and site any photo you may be using that you don’t have the right to.

1. Connecting Through Email Marketing
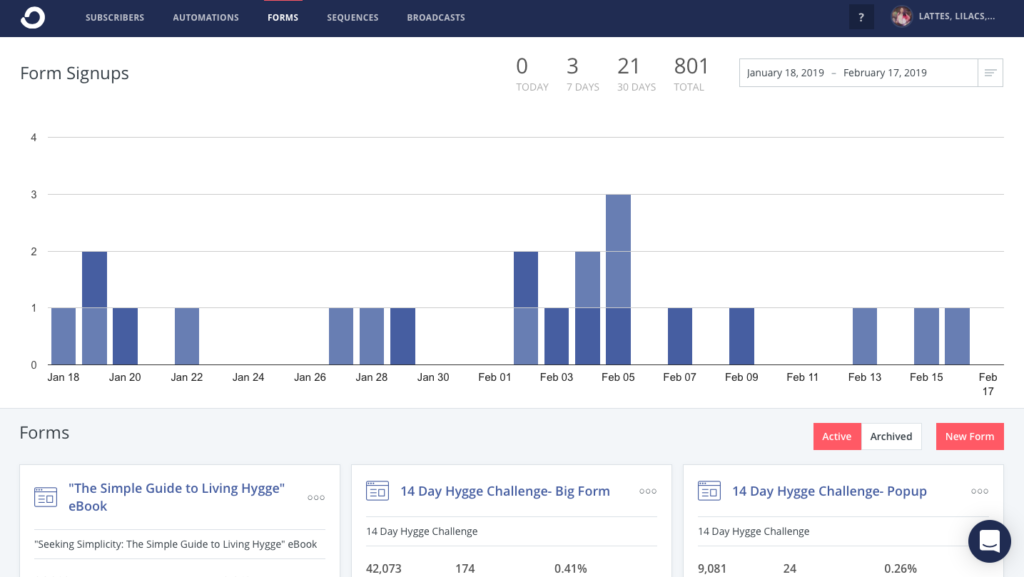
I use ConvertKit to collect and connect to my readers through email marketing. Every month my readers recieve a new custom Newsletter with family bucket list ideas, a new Spotify Playlist, some simplifying tips, and a new iphone wallpaper.
I try not to bog down my readers inboxes with a million emails, but sending them one valuable newsletter every month seems to do the trick and keeps me connecting to my followers in a special, unique way.
ConvertKit makes it easy to create sequences and send emails while you sleep. Once you’ve set up a form on your website to collect email addresses in exchange for a challenge or a freebie, ConvertKit does the rest of the work for you. It’s so simple and easy to use.
If you’re just starting out and looking for a free option, check out MailChimp. It’s free up to a certain amount of email subscribers and works nicely too.
2. Connecting On Social Media
Set up social media channels with your blog name to make it easy for your readers to find you. I started a Facebook page, Instagram, Twitter, & Pinterest with my blog name.
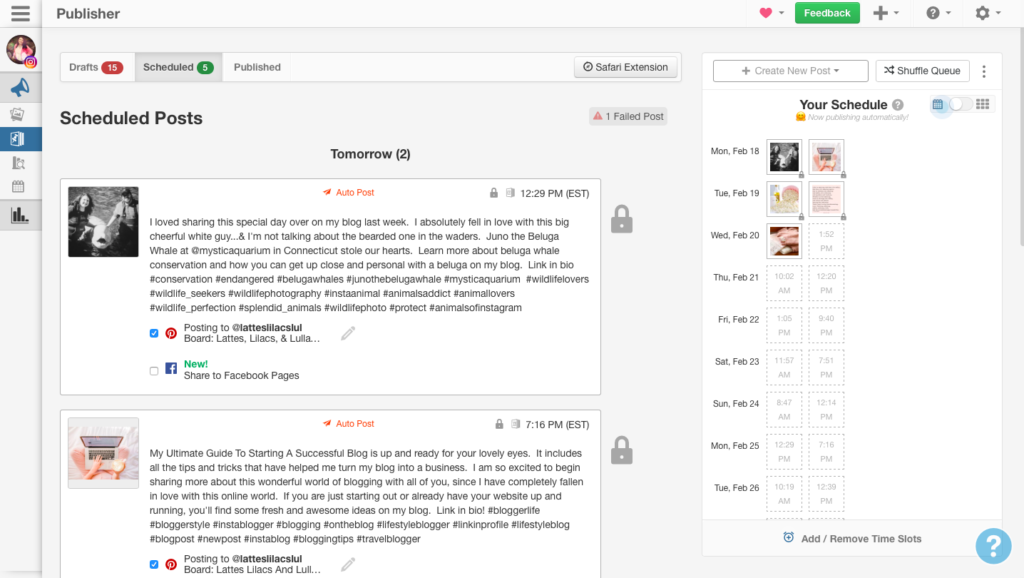
Social media can suck up a lot of your time, so try to only focus on 2 channels that you want to be successful at. My focus is on Instagram & Pinterest mostly. I use an automated system, Tailwind, to publish 2 Instagrams a day and over 50 pins to Pinterest every day. It’s a life-saver.
I then share my Instagram posts to Facebook and Twitter and post any new blog post articles to Facebook and that’s about it. Social media is where most of my readers find me, so it’s a great way to connect with people all around the world.
Make sure your bio description include keywords and feature what your blog is about. For me, I try to use “cozy lifestyle blog” “hygge” “travel” “family adventures, etc.
3. Sharing Pins On Pinterest
Pinterest is like google for bloggers and creators. I like to focus a lot of attention to Pinterest, because it drives so much traffic to my website.
Here are some Pinterest tips…
- Change your account to a business account.
- Apply to add Rich Pins…here’s a tutorial.
- Write a keyword rich description & share your website.
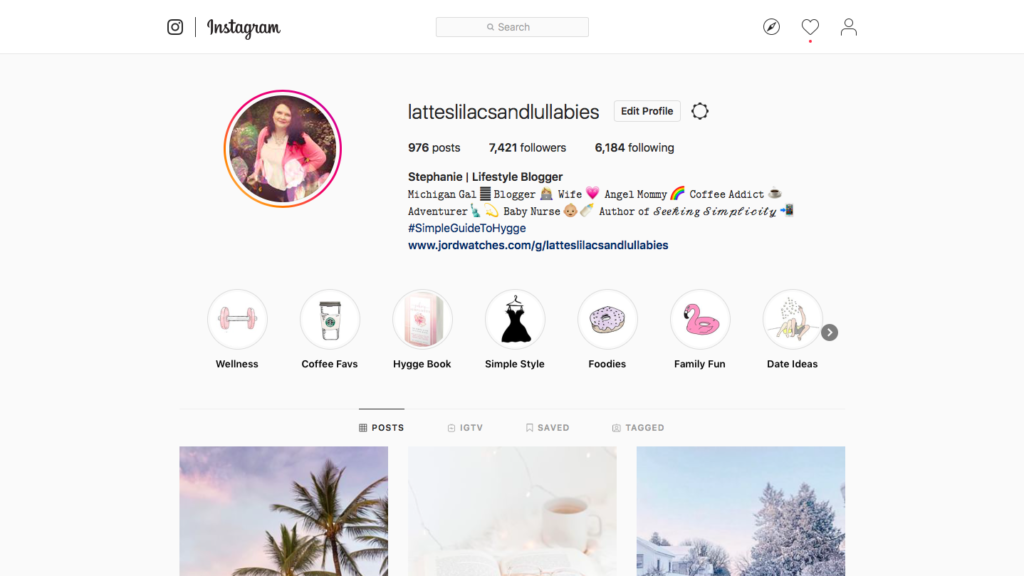
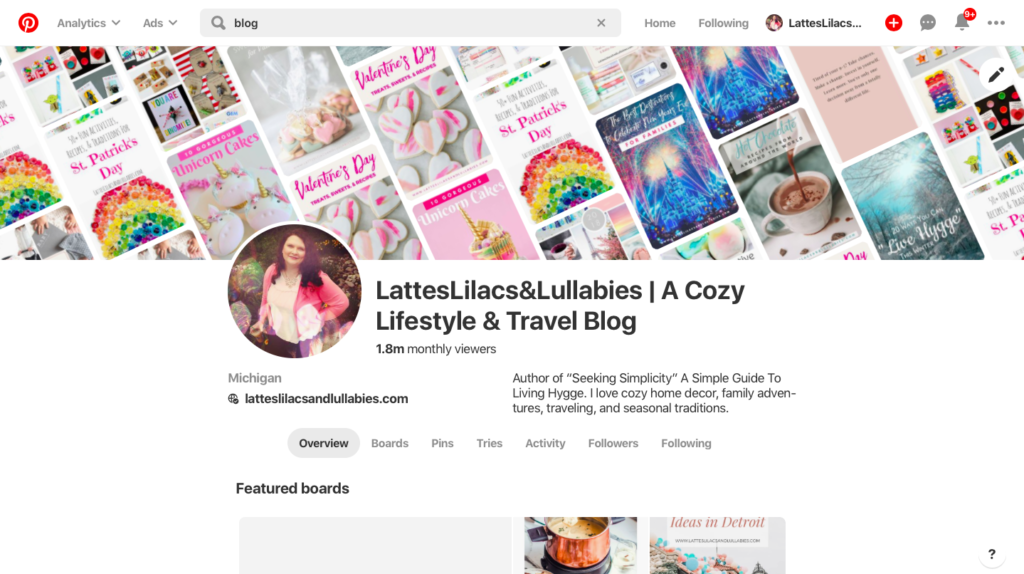
- Add keywords to your name as well. Check out my Pinterest for an example.
- Start a board that is just for you blog pins and make it the featured board.
- Search for group boards and join a few of them. This includes sending the admin an email stating why you’d be a good fit for their group board. I’ve joined close to 50 group boards and pin to the them regularly.
- Sign up for Tailwind so you can automate your pinning and keep your pins circulating.
Here’s an example of a rich pin…it displays my photo and website for a more professional look.

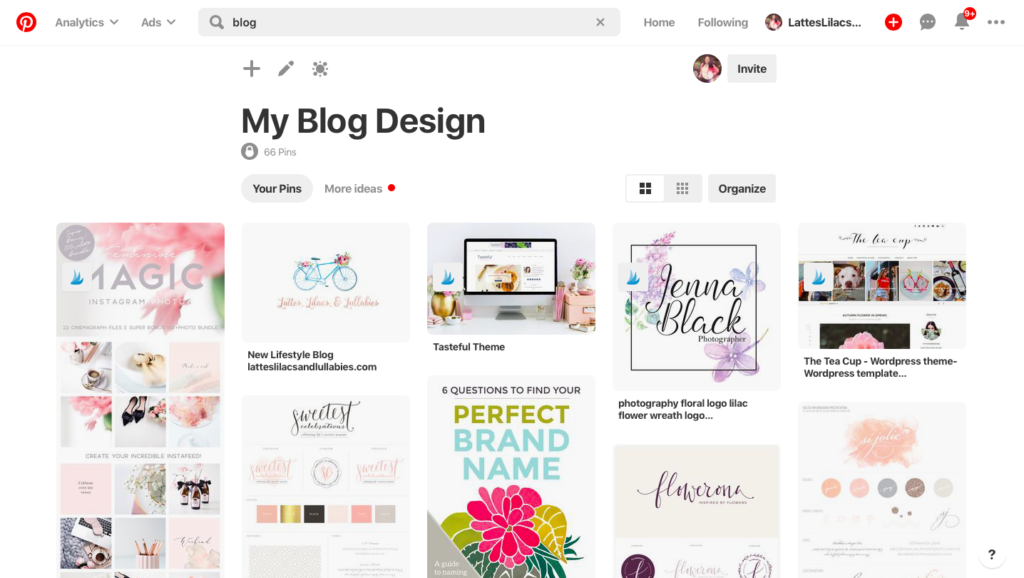
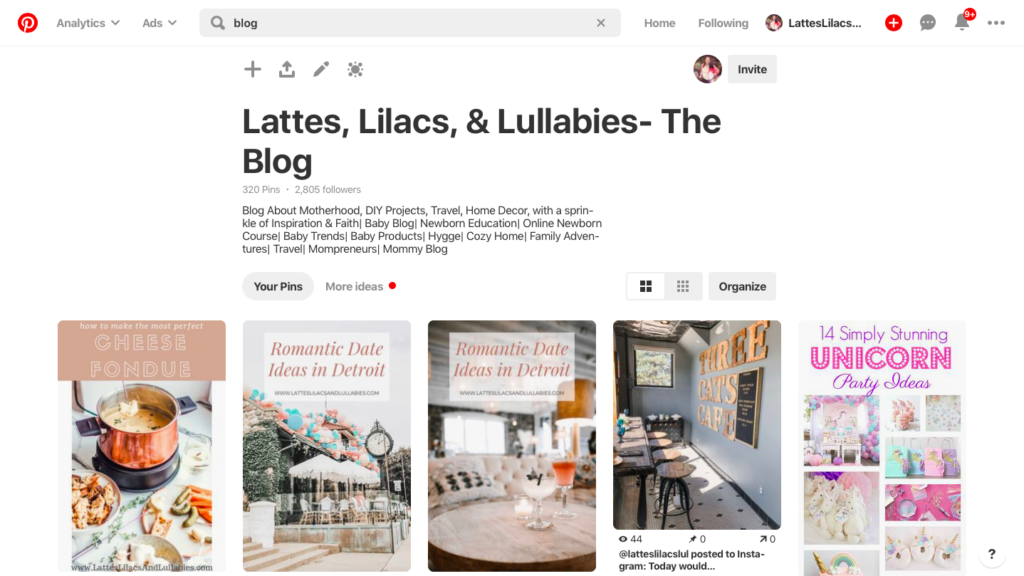
And, here is my blog’s Pinterest board filled with all of my own pins to my blog posts so that new friends can see what I share and write about. Notice the keyword-rich description of this board…
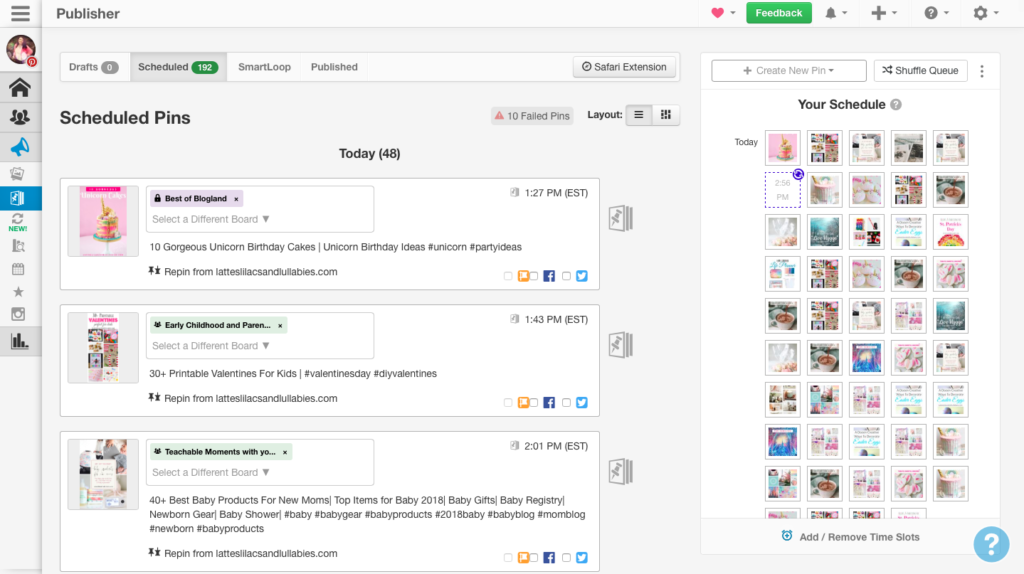
Also, check out my Tailwind schedule….
4. Sharing With Family & Friends
One of the hardest things to do is share you project with your family and friends. It can be a very vulnerable feeling, but share your blog with those that love and care about you.
They can give you the support and the encouragement to keep going when the nights of writing and coding seem long and lonely. Let your friends and family come along side you and be the cheerleaders and ambassadors to your new business.

I hope this blog post helped you narrow down exactly how to start your blog, create amazing content, and share you vision with the world! I know I referenced blog posts just like this one to get me started & I hope you do too!
If you are wanting a little more instruction, step-by-step videos, printables, & more then join the Wait List for my upcoming course called, Blogging Made Simple.
In this course, I’ll walk you through how to properly set up your blog, create amazing content, connect with readers on social media, and begin making money using affiliates, ads, and products.
Take your dream of starting a blog to a thriving business with Blogging Made Simple. Sign up today!


One Comment
Superb blog! Do you have any recommendations for aspiring writers? I’m planning to start my own site soon but I’m a little lost on everything. Would you suggest starting with a free platform like WordPress or go for a paid option? There are so many choices out there that I’m totally overwhelmed .. Any recommendations? Thanks!